

Fitting Angle Guide
Canopy Fitting Identification Flowchart
Answer four quick questions to identify the likely fitting category and see which additional measurements should be confirmed before ordering.
What is the inside angle of the fitting?
Measure between the side-rail socket and roof-rafter socket.
Identification Result
Your Selections
Confirm Before Ordering
- Measure the actual pipe outside diameter.
- Confirm the fitting socket inside diameter.
- Match the number and direction of all sockets.
- Identify the fitting’s location on the frame.
- Check bolts, eyebolts, pins, or set screws.
- Compare the complete product specifications.
This tool identifies a likely fitting category but does not guarantee compatibility. Canopy fitting dimensions and classifications can vary among manufacturers and frame systems.
How to Find the Angle of a Canopy Fitting
Learn how to measure the inside angle of a canopy fitting, identify whether your frame is flat roof, low peak, medium peak, high peak, or sloped, and choose a compatible replacement fitting.
“What angle are my canopy fittings?” is one of the most common questions customers ask when replacing a damaged corner, end, side, or peak fitting.
The angle built into the fitting determines the pitch and shape of the canopy roof. Even when two fittings have the same number of sockets and accept the same pipe diameter, they may not be interchangeable if their angles are different.
This guide explains how to measure a canopy fitting with a digital angle finder or manual protractor and how to compare your reading with common canopy fitting styles.
Shop Canopy FittingsWhy the Fitting Angle Matters
It Determines Roof Shape
The fitting angle establishes how sharply the roof rafters rise from the side rails toward the center peak.
It Controls Alignment
Corner, end, side, and center fittings must share compatible geometry so the frame pipes align correctly.
It Affects Cover Fit
A canopy cover is shaped for a particular roof profile. Changing the fitting angle changes the roof dimensions and slope.
Common Canopy Fitting Angles
Used for single-slope frames, wall-mounted shelters, and structures that drain in one direction.
Creates a level roof frame commonly used for temporary shade, storage, and specialty structures.
Creates a mild roof rise and is commonly used for traditional low-peak canopy systems.
Provides more roof rise than a low-peak frame without reaching the taller high-peak profile.
Creates a taller roof profile with increased center clearance and a more pronounced slope.
Where Is the Angle Measured?
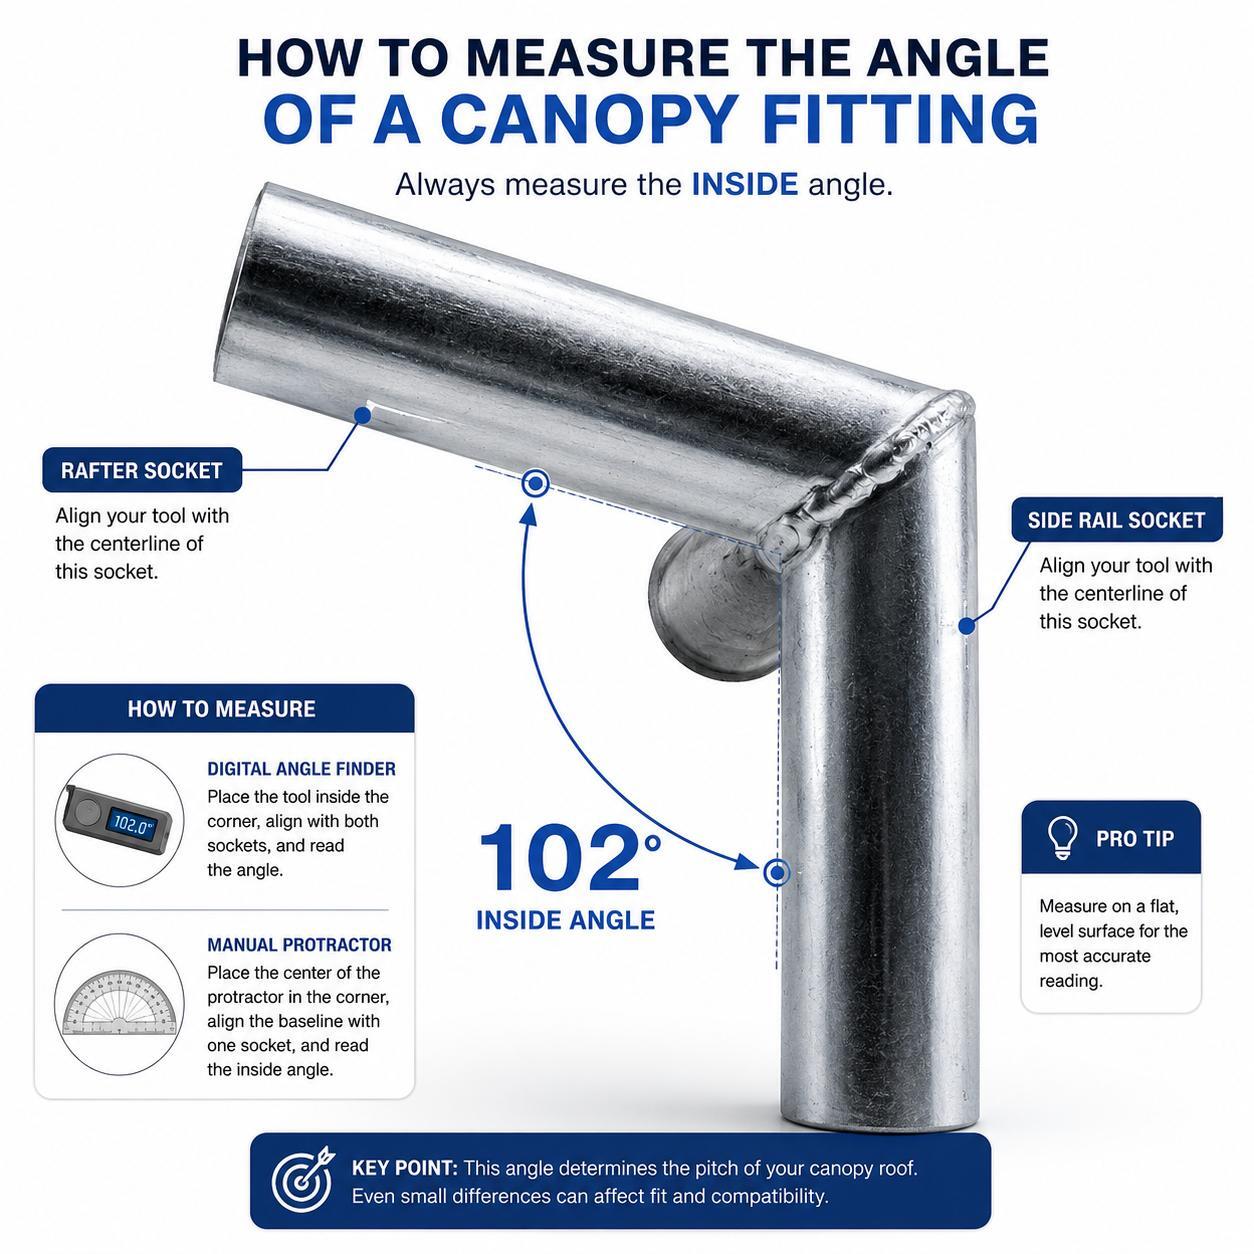
Use the Two Socket Centerlines
The relevant measurement is the included angle formed by the direction of the two sockets. One socket normally receives a horizontal side rail, while the angled socket receives a roof rafter.
- Measure inside the corner created by the two sockets.
- Align the tool with the direction of each socket.
- Avoid measuring against weld buildup or rounded edges.
- Take more than one reading to confirm the result.
- Round the result only after comparing it with standard fitting angles.
In the example shown, the inside angle is approximately 102 degrees, identifying the fitting as a low-peak fitting.
How the Angles Change the Roof Profile
Simplified comparison for identification purposes. Actual center height also depends on frame width, pipe lengths, fitting design, and rafter configuration.
Fitting Angle Comparison Chart
The bar lengths provide a visual comparison of the degree measurements. They do not represent proportional roof heights.
Method 1: Use a Digital Angle Finder
Remove the Fitting When Possible
Measuring a loose fitting on a stable, level surface is generally easier than trying to measure it while the frame is assembled.
Clean the Inside Corner
Remove dirt, corrosion, tape, or other material that may prevent the measuring surfaces from resting properly.
Zero or Calibrate the Tool
Follow the angle finder manufacturer’s instructions to zero the tool on a known flat surface before taking a reading.
Place the Tool Inside the Corner
Align one measuring arm with the horizontal socket and the other arm with the angled roof-rafter socket.
Record the Inside Angle
Hold the tool steady and record the displayed reading. Repeat the measurement at least twice.
Compare the Reading with Standard Angles
A reading near 102 degrees generally indicates low peak, approximately 110 degrees indicates medium peak, and approximately 120 degrees indicates high peak.
Method 2: Use a Manual Protractor
Place the Protractor’s Center at the Corner
Position the center point of the protractor near the intersection of the two socket centerlines.
Align the Baseline
Align the protractor’s zero-degree baseline with the direction of the horizontal socket.
Follow the Angled Socket
Identify where the centerline of the roof-rafter socket crosses the degree scale.
Confirm the Correct Scale
Many protractors include two opposing scales. Make sure you are reading the inside angle, not the smaller complementary angle.
Repeat and Photograph the Setup
Take a second reading and photograph the protractor in position. The photo can help a replacement-parts specialist verify the measurement.
How the Inside Angle Relates to the Roof Pitch
When comparing peaked fittings of a similar design, increasing the included angle generally causes the roof-rafter socket to rise more steeply from the horizontal side rail. This creates a taller center peak.
The fitting angle alone does not provide the exact finished center height. Frame width, rafter length, pipe insertion depth, fitting dimensions, and the overall frame layout must also be considered.
Angle Identification Table
| Measured Angle | Common Classification | Roof Appearance | Typical Identification Notes |
|---|---|---|---|
| Approximately 78° | Slope or lean-to fitting | Single-direction roof slope | Often used where one side of the roof is higher than the other |
| Approximately 90° | Flat roof fitting | Level or nearly level roof | The horizontal and vertical or adjoining sockets form a right angle |
| Approximately 102° | Low peak fitting | Shallow center peak | Common traditional low-profile canopy frame angle |
| Approximately 110° | Medium peak fitting | Moderate center peak | Visibly taller than low peak but less steep than high peak |
| Approximately 120° | High peak fitting | Tall, pronounced center peak | Commonly used where additional center clearance and roof slope are desired |
Allow for Normal Measurement Variation
A handheld measurement may not display the exact nominal angle stamped or specified for the fitting. Minor differences can result from:
Weld Beads
Raised or uneven welds can prevent an angle finder from sitting directly against the socket surfaces.
Rounded Tubing
A protractor may be difficult to align perfectly with the centerline of a round socket.
Tool Accuracy
Inexpensive or uncalibrated measuring tools may produce readings that vary by one or more degrees.
Fitting Wear
A bent, damaged, or previously repaired fitting may no longer match its original manufactured angle.
Viewing Position
Reading a manual protractor from an angle rather than straight on can cause parallax error.
Socket Alignment
Measuring against an outer edge instead of the socket centerline may produce an incorrect reading.
Why You Should Not Mix Fitting Angles
A 102° Fitting Is Not a Substitute for a 120° Fitting
Mixing low-, medium-, and high-peak fittings changes the geometry of the frame. The rafters may no longer meet the center fittings correctly, pipe sections may bind or fail to seat fully, and the roof may become uneven.
A changed roof profile can also prevent an existing canopy cover from fitting correctly. The cover may be too tight, too loose, or unable to reach its intended attachment points.
Pipes May Not Align
Different fitting angles direct the rafters toward different peak locations.
Fittings May Bind
Pipe ends may enter the sockets at an angle and fail to seat correctly.
The Frame May Twist
Unequal roof geometry can pull the canopy frame out of square.
The Cover May Not Fit
Changing the roof pitch changes the distance over the rafters and peak.
Angle Is Only One Part of Fitting Identification
After determining the angle, confirm every other important fitting characteristic before ordering a replacement.
Pipe and Socket Size
Confirm the outside diameter of the pipe and the inside diameter of the fitting socket.
Number of Sockets
Identify whether the part is a three-way corner, four-way side, five-way center, end fitting, or another configuration.
Socket Direction
Make sure every socket points in the same required direction as the original fitting.
Fitting Position
Determine whether the fitting belongs at a corner, end, side, center, ridge, or slope transition.
Fastening Method
Check for eyebolts, set screws, pins, swaged pipe ends, or other securing features.
Frame and Cover Style
Verify that the fitting works with the complete frame design and the intended canopy cover.
How to Identify a Fitting When You Do Not Have an Angle Finder
Place the Fitting on a Flat Surface
Orient the fitting so the horizontal socket appears level and the roof-rafter socket is clearly visible from the side.
Take a Straight-On Photograph
Position the camera perpendicular to the fitting. Avoid photographing from above, below, or at an angle because perspective distortion can change the apparent measurement.
Include a Ruler or Known Reference
Place a ruler near the fitting to help document the socket length and overall size.
Compare the Roof Profile
Compare the original canopy frame with known flat, low-, medium-, and high-peak profiles.
Send Multiple Photos and Measurements
Provide a side view of the fitting, full-frame photos, the pipe outside diameter, fitting socket inside diameter, and number of sockets.
Common Mistakes to Avoid
Measuring the Outside Angle
Canopy fittings are generally identified using the included inside angle shown between the relevant sockets.
Measuring Against the Weld
Weld buildup may prevent the tool from aligning with the true direction of the socket.
Reading the Wrong Protractor Scale
A dual-scale protractor may display both the intended angle and its complementary reading.
Judging the Angle from One Photo
Camera perspective can make a low-peak fitting look steeper or flatter than it really is.
Assuming All Peak Fittings Are 120°
Canopy systems may use low-, medium-, or high-peak fittings depending on the frame design.
Ignoring the Pipe Diameter
A correct angle does not make a fitting compatible if the pipe and socket diameters do not match.
Replacing Only One Incompatible Part
A fitting from a different roof system may not align with the remaining corners, sides, and center fittings.
Ordering by Appearance Alone
Similar-looking galvanized fittings may use different angles, socket sizes, or connection layouts.
Should You Replace One Fitting or the Entire Roof Set?
Replacing One Fitting May Work When:
- The original angle is confirmed.
- The pipe and socket sizes match.
- The socket arrangement is identical.
- The remaining frame components are undamaged.
- The original replacement style is available.
Consider a Complete Roof Set When:
- The original fitting angle cannot be identified.
- Several fittings are damaged or bent.
- The existing parts use a discontinued design.
- You want to change from low peak to high peak.
- The existing roof components do not match one another.
Changing the Peak Style Is a Frame Modification
Converting a canopy from 102-degree low peak to 120-degree high peak generally requires more than replacing one or two corner fittings. Compatible end, side, center, and ridge fittings may be required, and the existing rafter lengths or canopy cover may no longer fit.
Helpful Canopy Fitting Resources
Use these categories and guides to identify the correct angle, size, configuration, and replacement parts for your canopy frame.
- Shop All Canopy Fittings Browse corner, side, center, peak, flat-roof, slope, and specialty canopy connectors.
- Shop 102° Low-Peak Fittings Find galvanized fittings designed for shallow-pitch low-peak canopy frames.
- Shop 110° Medium-Peak Fittings Browse fittings that create a moderate roof pitch between low- and high-peak designs.
- Shop 120° High-Peak Fittings Find corner, side, end, and center fittings for taller high-peak canopy frames.
- Shop 90° Flat-Roof Fittings Browse right-angle connectors for flat roof and specialty frame configurations.
- Shop 78° Slope Fittings Explore fittings for lean-to and single-direction sloped canopy structures.
- Complete Canopy Fitting Guide Learn about fitting types, frame layouts, pipe sizes, diagrams, and common configurations.
- Shop Canopy Box Kits Choose coordinated fitting and frame component packages for compatible canopy builds.
- Use the Tarp and Canopy Product Selector Get guided help identifying the right canopy frame, fittings, cover, or shelter system.
Frequently Asked Questions
Where do I measure the angle of a canopy fitting?
Measure the inside angle formed between the horizontal frame socket and the angled roof-rafter socket. Align the measuring tool with the direction or centerline of each socket rather than with an uneven weld bead.
What angle is a low-peak canopy fitting?
Low-peak canopy fittings commonly used by Canopies & Tarps have a nominal 102-degree angle.
What angle is a medium-peak canopy fitting?
Medium-peak canopy fittings commonly used by Canopies & Tarps have a nominal 110-degree angle.
What angle is a high-peak canopy fitting?
High-peak canopy fittings commonly used by Canopies & Tarps have a nominal 120-degree angle.
What angle is a flat-roof canopy fitting?
A standard flat-roof fitting uses a 90-degree angle to create a right-angle connection.
Can I measure the fitting while it is installed?
You may be able to measure an installed fitting, but removing it usually provides better tool access and a more accurate reading. Make sure the frame is safely supported before removing any structural component.
How accurate does my measurement need to be?
The measurement should be accurate enough to distinguish among the standard angles. Take several readings and compare the result with 90, 102, 110, and 120 degrees while also confirming the fitting size and configuration.
Why does my angle finder show 101 or 103 degrees?
Minor variation may be caused by weld buildup, rounded tubing, tool calibration, fitting wear, or imperfect placement. A reading near 102 degrees may still indicate a nominal 102-degree low-peak fitting.
Are 102-degree and 120-degree fittings interchangeable?
No. They create different roof geometries. Mixing them can prevent the pipes from aligning and can change the roof profile enough that the existing canopy cover no longer fits.
Can I convert a low-peak canopy to a high-peak canopy?
A conversion may require a coordinated set of high-peak corner, end, side, and center fittings. Rafter lengths and the canopy cover may also need to be changed. Replacing only one fitting is generally not sufficient.
What other information do I need when ordering a fitting?
Confirm the angle, pipe outside diameter, fitting socket inside diameter, number of sockets, socket directions, fitting position, fastening method, and overall frame style.
How can I get help identifying an unknown fitting?
Take clear straight-on photos of the fitting and complete frame. Include the angle reading, pipe diameter, socket inside diameter, number of connections, and any manufacturer or part-number markings.
Find the Correct Replacement Canopy Fitting
Start by measuring the inside angle, but do not stop there. Confirm the pipe diameter, socket size, fitting configuration, frame position, and roof style before ordering a replacement.
Canopy fitting classifications and dimensions can vary among manufacturers and frame systems. Always compare the complete product specifications and do not rely solely on the nominal angle or visual appearance.